2 Cool Fishing Forum banner

Foam kayak build

1 reading
28K views 21 replies 11 participants last post by  sea hunt 202  
#1 ·
Long story short this past week I got invited to go on a kayak trip this weekend. I've never been kayaking and it's in the same area I duck hunt so of course I was down. But I didn't have a kayak. So my buddy jokingly told me I should build one because I build all sorts of stuff. Then I told him I'll take his challenge. So I had a gift card to Home Depot and fiberglass resin so there was a start. I know how stitch and glue works but I've never done it so I didn't want to go that route.

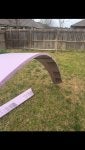
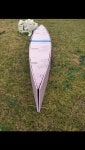
So I bought 2 sheets of 3/4 foam sheathing, and some fiberglass cloth.

I found 3 other foam kayak builds on the Internet. One guy carved it out of foam and epoxied painted cloth over it. That would work for a lake but I'm going in a river. So I got in touch with one guy on another forum about his build, he didn't think I could do a kayak similar to his in time. So he directed me to the stitch and glue route. That really got me thinking what steps I could take to have this thing done by Wednesday.

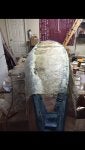
So my great idea was to use fiberglass cast strips(like for broken bones). Thanks to the Internet you can buy this stuff pretty easily. So I had it next day'd via Amazon for $60.(10 rolls of 2"x 4 yards) You can buy them cheaper if you have time to do lower shipping. You can buy them for about $3-4 a roll. If you don't know how these work, you dip them in warm water and roll them on and they harden within 20 minutes. I will use these to create a skeletal system.


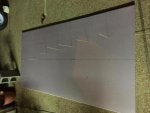
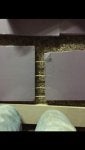
First step of business is cutting out the foam. I cut one sheet out and used it as a template. If anybody does this make sure to tape the template down when tracing it over, I didn't and I messed up. Nothing that can't be fixed though! I laid out dots and used skewers to make chalk lines.
 

Attachments

#4 ·
From there I used gorilla glue to glue the pieces together and let them dry over night. The next morning I used the casting tape and wrapped each piece twice. It made it really strong as you can see in the bend picture. If I had done that with the skewers and glue it probably would've broke.
 

Attachments

#6 ·
Now, I needed to put all the pieces together and use skewers in it to hold it in place while I use the casting tape to give it some bones.

After one failed attempt at wrapping it I realized this stuff doesn't stick unless it's to itself. So I called a buddy over and what we did was, one person would lay down the tape and another would staple it in place. Then once the person who had the tape ran out, they would turn on the water hose and shoot the tape to get it wet. After wetting it we would run our gloves over it to make sure it would have good form. We taped it on the bottom and on the sides with about a half inch overlay.
 

Attachments

#7 ·
After that we spackled the cracks. I did some research and found a lot of surfboard users said they use spackle as a substitute for wood flour(which is what real boat builders use). Spackle still soaks up resin and is very light weight so it works for me. I screwed in some supports(loosely, just enough to hold the shape). I moved from my backyard to the garage because we had rain coming the next day. Really starting to look like a boat!
 

Attachments

#8 ·
No for the hard part. I knew you couldn't use polyester resins on foam and that it needed to be a polystyrene. But I pretty much had a whole gallon of Bondo fiberglass resin(couldn't find out any info on what kind of resin it was) so I was really hoping it was a polystyrene....well it wasn't. I tested it on some pieces of foam and it ate away at it. It wasn't too bad but I wasn't comfortable using it.

Luckily I keep some resin called envirotex to use for my duck calls. That stuff did not melt the foam! So I used what I had left of that for the night on the bottom of the yak. But I wanted to try a science experiment.

So when you mix the envirotex it's a 1:1 ratio. When mixing fiberglass resin you use a few drops of catalyst. So I mixed one ounce of envirotex with one ounce of its harder, mixed with one ounce of fiberglass resin. Then I tested it on a scrap piece of foam. It created a small amount of a chemical reaction to the foam but didn't really eat it. I was happy with that so I left it over night.

The next morning I poked at the sample and it was still wet....not good. Then I got to thinking, 1. I didn't mix hardner in it. 2. I didn't mix an equal part. ( instead of mixing 3 ounces all together I should've done 4)

You can see the sample that got ate up at the left. The clear sample on the right is the envirotex. The coke looking sample of the mix of ingredients.

Dry times of the envirotex for a hard cure is 48 hours. Dry time for the fiberglass is 2 hours.
 

Attachments

#9 ·
Pardon my garage, it looks like I had a college frat party...

Back to the yak. When I made the bottom with envirotex I spread it up until the tape because I didn't have enough at the time. So I made the special mix and started spreading with the tape and moved to the walls. It would still have a chemical reaction to the foam but didn't eat it... for the most part. As long as I kept it moving and thin on the walls it didn't really do any damage. If you look closely at the picture you can see where the foam was "burned" from me working it back and forth. There were a couple of spots on my first run where it sat in the tap and burned through. It's not too bad, my thought on that is it was from the end of the run where I didn't mix the special mix in between spreading and the fiberglass catalyst went to the bottom of the cup. Like I said, minimal and fixable damage.

I did all this, this afternoon. I went back and checked on it a few hours ago and a lot of it had already dried and some parts are still tacky. The tape is as hard as a rock though. The only flexing is in the sides since it's not fiberglassed in place yet and the wood supports are barely screwed in.

Game plan for tomorrow is to fiberglass the wood supports before work, comeback at lunch with more envirotex and do the whole inside(not the mix because I might try and just do fiberglass on the outside of the boat). Then hopefully start laying glass at night.
 

Attachments

#10 ·
Today I did some wood work on the inside for support. I also started laying down glass Matt on the bottom. I wanted to do one layer of Matt on the bottom just so a branch won't go through or anything. I ran out of resin thought so back to the store tomorrow.

You can also see where my "magic potion mix" ended up burning at one of the casting tape seems. Nothing that will hurt it it once I add more Matt.

I would also like to add the tape created awesome support and is absolutely as hard as a rock with the Matt over it.
 

Attachments